














































Portable breast pumps can keep your hands free at work once fit, bra, commute bag, and cleaning routine have been tested at home. A loose seal, an unexpectedly loud motor, or a forgotten storage cap are far more troublesome in a hallway, shared sink, or dim lactation room than at home in a nursery chair. Problems are easier to spot during a home trial and easier to fix than mid-meeting. This guide walks you through a complete portable breast pump fit check, including bra and flange alignment, movement, noise, milk storage, packing, and cleaning.
This article offers general pumping preparation advice, not medical guidance. Stop using the pump if you feel sharp pain, bruising, skin damage, or repeated clogs. For sizing, output, or pain that does not improve after fit adjustments, consult an IBCLC or healthcare professional.


Table of Contents
- Why Portable Breast Pumps Fail on the First Workday
- Start with Bra Fit, Flange Alignment, and Seal Stability
- Run a Full At-Home Workday Simulation
- Check Noise, Clothing Fit, and Workplace Privacy
- Plan Power Milk Storage and Packing for a Full Workday
- Practice Cleaning and Reset Between Sessions
- Conclusion
Why Portable Breast Pumps Fail on the First Workday
Most wearable pump problems on the first workday are small, not dramatic. The pump turns on, the app connects, and the parts are clean. Then the bra shifts on the walk to the wellness room, the motor sounds louder in a quiet office than it did at home, or the storage cap is still on the kitchen counter. None of this means a portable pump will not work at the office. It usually means the first full test waited too long.
Treat it as one full workday rehearsal, not six separate checks. Find where the routine breaks before that break lands between meetings. The rehearsal should cover setup, pumping, movement, milk transfer, cleanup, and bag reset in the same order you will use at the office.
The most common first-day risks are easy to miss.
- Seal failure can cause leaks or weak output.
- Poor alignment can make a normal session feel uncomfortable.
- Noise and clothing shape can make privacy feel harder than expected.
- Low battery or missing storage pieces can shorten a session before it is done.
- No cleanup plan can leave used parts mixed with clean items.
Fix one failed step at a time. Changing the bra, flange insert, bag layout, and shirt in the same test makes it hard to know what actually helped.
Start with Bra Fit, Flange Alignment, and Seal Stability
The first real decision is whether the pump can stay sealed in the bra you plan to wear. A soft nursing bra may feel fine around the house, then let the cup sag once the motor and milk container add weight. A firmer bra can help, but too much pressure may flatten tissue around the cup edge and make pinching or leaks worse. The right bra holds the pump close without pressing it flat against your skin.
Flange size belongs in this same first check. Size can shift after the early postpartum weeks, so do not rely only on the insert that worked right after birth. The nipple should move into the tunnel without hard rubbing. Too much space can pull in extra areola tissue. Too little space can create friction and weaker milk removal.
| Fit issue | What it may feel like | What to check first |
| Flange too small | Rubbing, pinching, or nipple compression | Recheck nipple measurement and insert size |
| Flange too large | Areola pulled in or weak suction | Try a smaller insert if available |
| Bra too loose | Pump shifts when walking or leaning | Use a more supportive pumping or nursing bra |
| Bra too tight | Pressure marks or reduced comfort | Loosen straps or change cup structure |
At work, you may not have a large mirror or ten quiet minutes. Practice placing the pump the way you would in a lactation room, stall, parked car, or wellness space until centering the nipple feels familiar. If the seal fails after one careful reset, go back to bra support or insert size instead of forcing a full session.
If you are still choosing a pump before your first week back, browse the eufy breast pumps to compare sizing support, charging options, and replacement parts before you buy. Fit problems are easier to avoid when you plan the pump, inserts, and backup parts together.
Run a Full At-Home Workday Simulation
The home test works best as one run-through. Do not test movement in one room, milk storage later, and cleaning the next morning. Pick a time close to when you expect to pump at work, put on the bra and top you plan to wear, pack the bag, and move through the whole session as if you were already at the office.
Watch for awkward handoffs. Placement may feel fine, but pouring milk into a storage bag gets messy. The pump may stay sealed while sitting, then shift when you lean over your tote. The session itself may go well, but used parts have nowhere clean to go. A full rehearsal is what surfaces those problems.
Pack the pump bag, walk to another room, place the pump, start your usual setting, and move for fifteen minutes before you trust the seal. Many leaks do not show up while sitting still. They show up when the cup has some weight, your posture changes, or the bra shifts during a walk.
During those fifteen minutes, stick to normal office moves:
- At your desk: type, reach for your phone, turn slightly in your chair
- Walking: stand, walk down a hallway, turn corners at a normal pace
- Reaching and leaning: reach for a lower drawer, your bag, or the sink
- With milk in the cup: repeat a few of the moves above
Then finish the rehearsal in workday order:
- End the session
- Transfer milk into the bottle or bag you plan to use at work
- Put used parts where they would go at the office
- Pack everything back into the bag
This is where the routine either starts to feel realistic or shows you exactly where it breaks.
If leaks repeat during practice, do not plan to push through them at work. Fix fit first, or ask an IBCLC to review flange size and bra support. A first workday already has enough variables.
Check Noise, Clothing Fit, and Workplace Privacy
Whether a pump feels too loud is not just about the decibel number. A pump can look quiet on paper and still sound loud in a small room with thin walls. Test the sound before assuming office background noise will cover it. Turn off the TV, fan, dishwasher, and white noise machine. Use your usual expression mode and record a short voice memo a few feet away. Play it back at normal volume.
Wear the tops you plan to use at work. Loose sleep shirts do not tell you much about an office day. Test the pump under a blouse, sweater, blazer, nursing tank, or dress you might actually wear. Darker colors, textured knits, patterns, and a cardigan often hide the outline better than thin, pale fabrics. Button placement matters too. A blouse that looks fine while standing may pull across the chest when you sit.
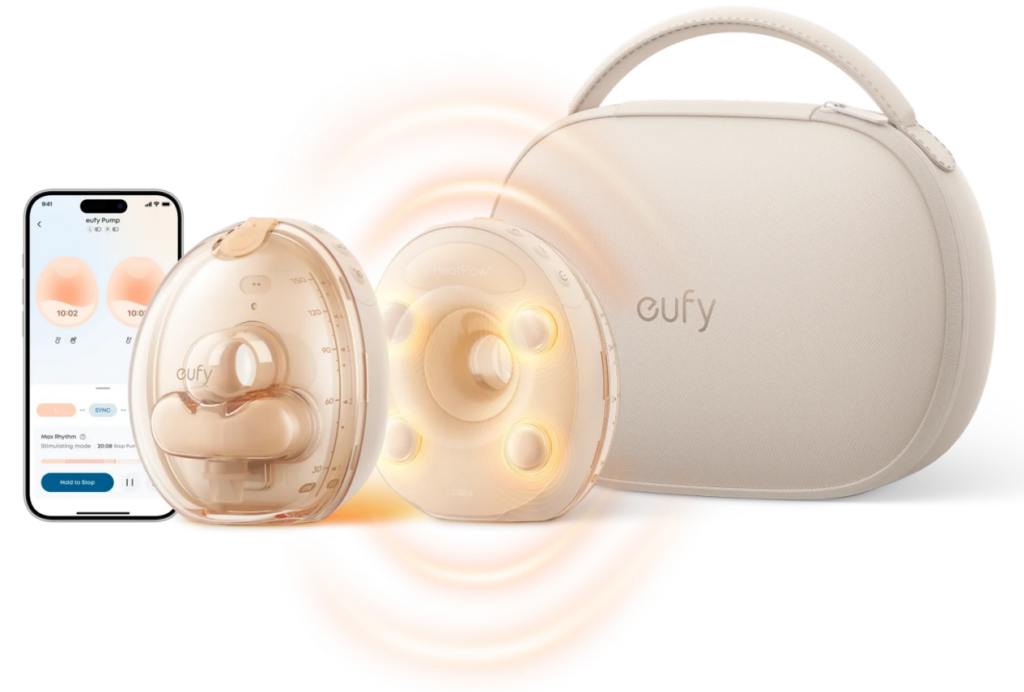
If the eufy Wearable Breast Pump S2 Pro is your work pump, run the same at-home noise and privacy checks you would use for any wearable. In a dim lactation room, the see-through tunnel and nipple light help you center the flange without bright overhead light or a second shirt adjustment. When you lean to pack your bag or walk back to your desk, see whether the double-sealed silicone flange stays flush at the cup edge or starts to pull away. If let-down feels slow or pumping feels uncomfortable in a cold room, try VibraPump™ massage and HeatFlow™ 2.0 warmth during the rehearsal to see whether they make a short work break easier to sit through. At about 46 dB, playback sound is low enough for many closed-door offices, and the wireless charging case can support a later session without hunting for an outlet between meetings.
Privacy also depends on the space you expect to use. If your office has a dedicated lactation room, test the pump with the door closed at home. If you may pump in a car or shared wellness space, test the steps needed to place, start, pause, and remove the pump without spreading parts across a surface.
Plan Power Milk Storage and Packing for a Full Workday
A portable breast pump for work can fail quietly when power or storage is wrong. Charge the pump and case fully before your home rehearsal, then run the full session on battery if that is how you plan to pump at work. After the session, check the remaining battery and decide whether a second or third session would need the case or cord. That result tells you more than the product page alone.
Power Planning by Session Count
How many times you pump changes the power plan more than the bag size:
- One or two sessions: a full overnight charge is often enough if it matches your home battery test
- Three sessions: plan where the pump will charge between the second and third session
- Four sessions or travel days: bring the charging case, a spare valve or insert, and cold storage for a late commute home
Practice Milk Storage at Home
At the transfer step in your rehearsal, work through these details. Use the same bottles or bags you plan to take to work. Label with date and time if your daycare or caregiver requires it. Confirm caps seal properly and that bags do not puncture when packed beside keys, a laptop, or a hard-sided lunch container. Pour slowly so milk does not splash the cap threads. Many people skip this because it seems simple. It stays simple until a cap leaks.
Commute Bag Checklist
Pack the commute bag at home, then unpack it the way you would at the office:
- Pump kit: charged unit, case or cord, sizing inserts, spare nursing pads, one small replacement part
- Milk kit: bags or bottles, caps, labels, cooler bag only if the office fridge is not an option
- Leak backup: light top, scarf, or wet bag
If clean flanges sit under laptop cords and snacks, the first session starts messy before pumping even begins.
Before your return date, check the eufy breast pump accessories for sizing inserts, spare valves, diaphragms, and extra containers. Tiny parts are easy to forget, and a worn valve can make a good pump feel weak.
Practice Cleaning and Reset Between Sessions
Cleaning is its own fit check because many offices are not set up for pump parts. Follow your pump manual for first-use sterilization. After that, confirm which pieces touch milk, which can be wiped between sessions, and which need a full wash at home.
Between Sessions at the Office
If your office only has a shared sink, practice the version of cleanup you can realistically do there. Some parents can rinse and dry parts on a clean mat. Others need to wipe parts, bag them separately, and wash fully at home. Either way, used parts should not end up beside clean storage bags, snacks, keys, or breast pads.
Use small pouches so clean parts, used parts, and milk storage do not mix. Keep a dedicated bag for used flanges, cups, valves, and seals. If your workspace is tight, this small bit of organization matters more than an oversized tote.
End-of-Day Reset
When you get home, unpack the bag before parts disappear into tomorrow’s rush. Put milk away first. Wash milk-contact parts according to the pump manual. Let parts dry before sealing them in a pouch. If you used a spare valve, insert, or storage bag, replace it before the bag goes back by the door.
The end-of-day reset is also the place to decide what needs changing. If the seal failed, address bra support or flange fit. If setup took too long, reorganize the bag. If output was lower than usual, check alignment, comfort, timing, and stress before assuming the pump cannot work for you.
Conclusion
The first workday goes smoother when the full test happens at home first. Run setup through cleanup in the bra, top, and bag you actually plan to use. If the seal holds, the sound feels manageable, storage works, and the bag reset stays simple, your first week back has fewer surprises. Stop for pain, clogs, skin damage, or supply concerns, and consult an IBCLC or healthcare professional.