


What You Need To Know
- Adjusting UPVC door hinges can be a confusing process due to the number of screws present
- It’s best to look up a UPVC door hinge adjustment diagram for the type of hinge you have fitted
- Most of the time, a specific screw will adjust the door’s compression, height or vertical position
- If required, contact a locksmith to find out what screws to adjust to fix the problem(s) you face
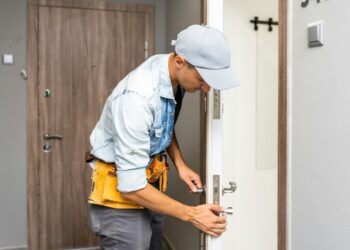
As many individuals will have found, adjusting UPVC door hinges is more confusing than it appears. What often seems like an easy DIY fix to your door alignment issues can become complex. Why? Well, there are multiple screws on even the most basic of UPVC door hinges. To adjust UPVC door hinges properly, you need to know which screw to adjust. How can you tell?
Let us give you a breakdown of what you need to know. In this article, guided by insight from security lock experts at Locks & Hardware, you can get a better idea of which screw you should be adjusting. Each screw on your hinges does different things, so making sure you adjust the correct screw is vital to troubleshooting whatever issues you happen to be dealing with. Let’s take a look at the issue so you can know what to expect.

How Do I Adjust The Hinges On A UPVC Door Properly? Finding The Right Screw
So, the main challenge most people find is that, without a UPVC door hinge adjustment diagram, they have no idea where to start. That makes it easy to adjust the wrong hinges, and that means you can actually make the problem you are dealing with worse, not better!
Identifying the correct screw is vital to making a smooth adjustment to your door hinges. Most of the time, you will need to adjust a specific screw to relate to a problem, such as:
- Your UPVC doors are not aligned properly, meaning the door has visible gaps around it
- You have problems with draughts coming through your door, requiring an adjustment
- Door locks are not working correctly, meaning your lock is not lined up with the latch
- Doors catch on the ceiling, floor and/or door frame because they are misaligned
Most of the time, fixing these issues is as simple as adjusting your UPVC door hinges. However, adjusting UPVC door hinges correctly is essential. If you adjust the wrong hinge, you can align your door incorrectly. You might not fix the problem you already had, but exacerbate another issue at the same time!
Breaking Down The UPVC Hinge Screw Types You Need To Adjust
There are various screws on your UPVC door hinges. Each screw has its own purpose, and working out what each hinge screw does is important. Before adjusting UPVC door hinges, read through the next section. You should be able to get a better idea of what you are dealing with.
Butt Hinges
Butt hinges are among the most common UPVC door hinge types that you will find. These look the most like a standard hinge, and also have the most variable number of screws you can potentially adjust.
- The top hinge screw – found at the very top of the hinge itself – adjusts your door’s height. Adjust this clockwise to raise the door, and counterclockwise to lower the door.
- The bottom hinge screw is the one you will adjust to adjust the door vertically. Adjust this at the same time as you adjust the top screw to make sure you get a balanced finish.
- The small hinge screws found on the hinge leaf should all be tightened slowly. These usually only need to be adjusted in small increments and tightened once the door is properly aligned.
Flag Hinges
Flag hinges aren’t quite as common, but they are still regularly used on many older UPVC doors. These hinges usually allow you to adjust the height and the compression of the door.
- Most flag hinges will have a screw cap that you need to remove with a screwdriver before starting. Pop these off using a flathead screwdriver.
- Your flag hinge might also have two Phillips screws that need to be adjusted before the adjustment screws will move.
- To adjust the compression of your door, you need to adjust the screw found on the middle part of your flag hinge. Clockwise turns tighten, counterclockwise to loosen.
- To adjust the height of your door, you should adjust the top hinge backwards and the bottom hinge forward. Adjust in small increments until you find the right balance.
T-Hinges
T-hinges are a little similar to a flag hinge, with some important differences that we will try to cover below.
- Like a flag hinge, you will need to remove a hinge cover cap so you can get proper access to the hinge adjustment screws. Pop this off with a screwdriver.
- The screw at the top of the hinge can adjust your door’s vertical position. Turn this backwards to slowly adjust the doors’ verticality. Perform this one full rotation at a time.
- The bottom hinge will adjust your door’s compression. Turn this with a Hex key to adjust the compression; clockwise to tighten and counterclockwise to loosen.
- Most t-hinges will also have a compression adjustment screw on the side of the main ‘flag’ section. Adjust this using a Hex key as well if you need to.
Pro Tip: Find Diagrams For Your Own Door
We also recommend that, if you want to make life easier, you find a UPVC door hinge adjustment diagram for your own door. Most door manufacturers will upload schematics and manuals online.
Open up your door, and somewhere on the door, you should be able to find information about your door. Simply Google the door type and manufacturer name – if you can find it – and see what comes up online. You may be able to find a diagram specific to your door, including the hinges that it should use.
Otherwise, contact the locksmith/joiner who fitted your doors for you. They should be able to tell you the door make and model number.
Observe, Adjust & Test For The Best Results
Now that you know which screws to look at when adjusting UPVC door hinges, you should give it a go. We recommend that you observe the screws closely first before acting, though; make sure you are going to be adjusting the right part of your hinges!
Adjust slowly, too; most hinges need nothing more than a quick half-turn or one singular full-turn. Once you have turned the screw in whatever direction(s) you need, test the door. Always test after each adjustment; you can save yourself a lot of back-and-forth by being proactive with door testing.
Observe, adjust slowly, and test. This is the 3-step process; with the above insight and a useful UPVC door hinge adjustment diagram, you should be able to make short work of most hinge adjustment needs. If you are still struggling, contact a locksmith and observe what they do so you can learn for the future.