


















































You ordered a large. You always wear a large. It arrived, and it fits like a tent, or worse, like a medium. That’s not bad luck, and it’s not your body. It’s that clothing sizes are basically a suggestion, and streetwear is the worst offender of them all. A hellstar large and some other brand’s large can differ by four inches across the chest, which is a genuinely enormous gap. I’ve graded size charts for a living and I still get it wrong when I shop carelessly. The fix isn’t guessing better. It’s learning to ignore the letter on the tag entirely and read what actually matters. Let’s sort this out properly.
The Letter on the Tag Means Nothing
Here’s the uncomfortable truth: there is no legal or industry standard defining what “large” means. None. Every brand decides for itself, and they decide based on their own customer base, their own fit philosophy, and sometimes just whatever their factory did last time. So a large from a brand cutting for a slim European fit and a large from a brand cutting oversized American streetwear can differ by six inches around the body. Same word, completely different garment. That’s why your usual size fails you constantly across brands. It gets worse with streetwear specifically, because the whole category is built on intentional volume. Many brands cut their pieces oversized at true size, meaning their medium already has the drop shoulders and roomy body you’d expect from a large elsewhere. Size up on one of those and you’re suddenly swimming. Meanwhile, other streetwear brands cut true to standard sizing and expect you to size up yourself if you want the relaxed look. Two identical-sounding approaches, opposite outcomes. My honest opinion? The size letter is the least useful piece of information on any product page, and treating it as meaningful is why most people get burned. Ignore it entirely. The numbers underneath are where the truth lives, and once you shift your attention there, ordering correctly stops being a gamble and becomes something you can actually control.


The Measurement That Matters Most
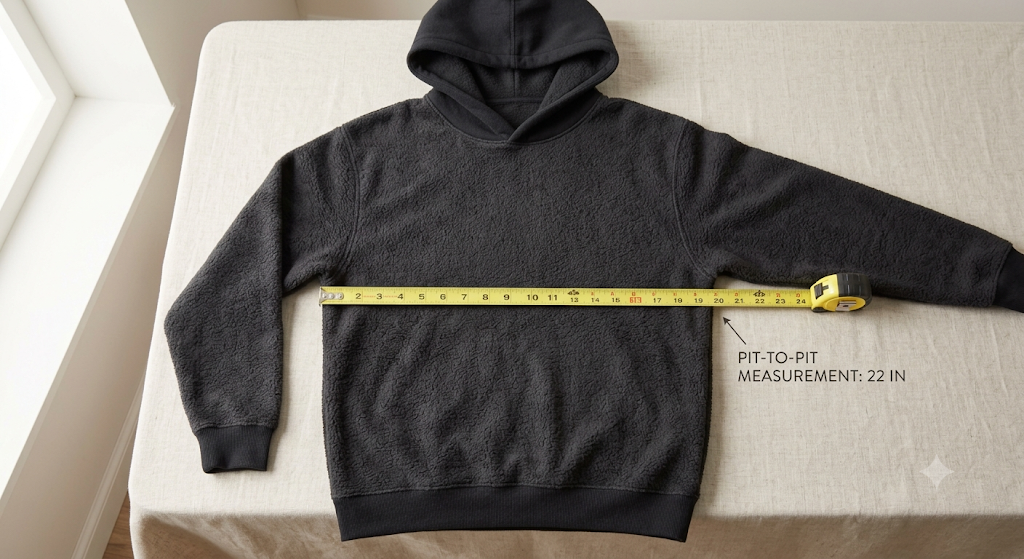
If you learn one number, make it chest width, sometimes called pit-to-pit. It’s the single most predictive measurement for how a top will fit, and it’s easy to check yourself. Here’s how it works. Lay a garment flat, then measure straight across from one armpit seam to the other. That’s your pit-to-pit, usually listed as a flat measurement rather than a circumference, so a listing of 24 inches means the actual chest circumference is 48. Compare that number against a piece you already own and love, measured the same way. Suddenly you’re not guessing at all. You’re matching a known good fit to a number on a page. Body length is your second key measurement, telling you where the hem lands, and it matters enormously for streetwear since a piece ending at mid-thigh reads completely differently from one ending at your hip. Sleeve length rounds it out. These three numbers describe a top almost completely. A brand that publishes them clearly is telling you something about how much they care, honestly. The parke sweatshirt collection, for instance, describes its relaxed fit and construction openly rather than leaving you to guess from a photo. Vague listings with no measurements aren’t hiding anything sinister. They just don’t expect you to check. So check anyway, and if the numbers aren’t there, email and ask. Any decent store will send them.
How to Measure Your Own Reference Piece
You need a baseline before any of this helps, and building one takes about three minutes. Grab your best-fitting hoodie and follow this:
- Lay it flat on a table or bed, smoothing out wrinkles so nothing bunches or stretches
- Measure pit-to-pit, straight across from one armpit seam to the other, and write the number down
- Measure body length from the highest point of the shoulder straight down to the hem
- Measure sleeve length from the shoulder seam to the end of the cuff
- Save all three numbers in your phone’s notes, labeled with the garment they came from
That’s your reference. From now on, every product page you check gets compared against those numbers instead of against a letter. Do this for one hoodie you love, one tee you love, and one pair of pants, and you’ve built a personal size chart that works across every brand on earth. Keep the tape flat and don’t pull it tight, since stretching the fabric while measuring throws everything off by an inch or more. Take a couple of extra minutes and measure a piece you dislike too, noting why. Too tight across the chest? Too short in the body? Those numbers tell you where your limits sit, which is just as useful as knowing what works.
Reading Fit Descriptions Correctly
Brands describe their cuts in words, and those words carry real information if you know how to decode them. “True to size” means their sizing follows conventional expectations, so your usual size should land as expected. “Relaxed fit” means slightly roomier than standard, with extra room through the body but not dramatic. “Oversized” means the volume is built in deliberately, with dropped shoulders and a boxy body, and this is the one that catches people out because sizing up on an already-oversized cut usually goes too far. “Boxy” describes the shape rather than the volume, meaning the piece is cut wide and straight rather than tapering at the waist. When a listing says “unisex,” pay attention, since unisex sizing typically follows men’s proportions and often runs large on smaller frames. Vague words matter too. If a description just says “comfortable fit” with no other detail, that’s a brand not telling you much. Look at the model photos next, checking the listed model height and size worn, which good stores publish. That’s genuinely useful context. Then hunt for real customer photos, because studio shots are pinned and styled to look perfect in ways your delivery never will. Here’s the hands-on detail worth knowing: look at where the shoulder seam sits on the model. If it’s dropped down onto the upper arm, that’s an intentional oversized cut and you should probably take your normal size. If it sits right on the shoulder point, the piece is cut standard and you can size up if you want volume. That one visual check predicts more than any description does.
The Signals That Predict a Bad Fit
Certain patterns on a product page reliably lead to disappointment, and spotting them saves you the return hassle:
- No measurements listed anywhere, which usually means nobody expects you to compare properly
- Only one model photo, since a single angle hides how the piece actually falls from the side or back
- Vague fit language like “comfortable” with no cut description, telling you almost nothing useful
- Reviews mentioning size inconsistency, especially several saying different things about the same piece
- Photos where the model is clearly holding or pinning fabric, hiding the true drape at the back
That last one is more common than you’d think, and once you notice it you can’t unsee it. A model with hands in pockets pulling a hoodie taut shows you a shape the garment doesn’t naturally have. Look for photos with arms down and relaxed. Review reading deserves your time too. Skip the five-star one-liners and go straight to the three-star reviews, since those are where people describe exactly what surprised them. Words like “runs small,” “much bigger than expected,” or “shoulder seams too far down” appearing repeatedly tell you everything the listing didn’t. My preference is to trust twenty specific reviews over any official size chart, because charts describe intent while reviews describe reality.
When Sizing Up Actually Makes Sense
There’s a lot of bad advice telling people to just size up for streetwear, and it’s wrong about half the time. So when does it actually work? Size up when the brand cuts true to size and you want more volume than their standard fit gives. That’s the legitimate case. If the measurements show a chest width close to your regular fitted pieces and you want a relaxed drape, going one size larger gets you there cleanly. Size up when you plan to layer heavily underneath, since a piece that fits perfectly over a tee will strain over a thick hoodie. Winter outer layers genuinely need that extra room. Don’t size up when the piece is already described as oversized or boxy, because you’ll end up with sleeves past your fingertips and a hem at your thighs, which stops looking intentional and starts looking like a mistake. Never size up more than once. Two sizes above your true size is where drape turns into hanging, and hanging never looks styled. A hellstar hoodie, for example, is cut with a slightly oversized lean already, so your normal size usually lands right where you want it. One honest limitation worth stating plainly: even perfect measurements can’t fully predict drape on your specific body, because how fabric falls depends on your shoulders, posture, and proportions in ways no chart captures. Some trial and error is unavoidable. So check the return policy before ordering anything you’re genuinely unsure about, and treat a first order from a new brand as a calibration rather than a certainty.
Building Your Own Cross-Brand System
Once you’ve got reference measurements, the whole thing becomes a system rather than a series of guesses. Keep those numbers in your phone permanently. Every new brand you shop, pull up the size chart, find the size whose chest width matches your reference within an inch, and order that regardless of what letter it carries. You’ll order a medium from one brand and an XL from another, and both will fit correctly. That feels strange at first. It shouldn’t. The letter was always arbitrary. Track your results too, adding a note when something arrives and fits well or badly. Over a year you’ll build a personal map of which brands run which way, and that knowledge compounds. I keep a short list of brands where I know my size cold, and shopping those takes ten seconds. New brands get the full measurement check. Also, don’t fight your body proportions. If you’re long in the torso, body length matters more to you than chest width, so weight your checks accordingly. If your shoulders are broad, that pit-to-pit number is doing the heavy lifting. Everyone’s key measurement is slightly different, and figuring out yours is genuinely useful self-knowledge. The system takes one afternoon to build and then saves you money and returns forever.
Final Words
The size on the tag was never going to work, because nobody agreed on what it means. Measure a piece you love, save those three numbers, and compare them against every product page from now on. Read fit descriptions carefully, watch where the shoulder seam sits on the model, and trust specific reviews over official charts. Size up only when a brand cuts true and you want volume, never when it’s already oversized. Do this and ordering online stops being a gamble. You’ll get the fit you pictured, first try, from brands you’ve never shopped before. Ignore the letter. Trust the numbers.
FAQ BLOCK
Q: Why do sizes differ so much between brands?
A: There’s no industry standard defining what “large” means. Each brand sets its own sizing based on its customer base and fit philosophy, so two larges can differ by several inches across the chest.
Q: What’s the most important measurement to check?
A: Chest width, or pit-to-pit. Measure a top you already love flat across from armpit seam to armpit seam, then match that number against product pages. It predicts fit better than anything else.
Q: Should I size up for streetwear?
A: Only if the brand cuts true to size and you want more volume, or if you’re layering heavily underneath. Don’t size up on pieces already described as oversized or boxy, since you’ll overshoot badly.
Q: How can I tell if a piece is cut oversized?
A: Look at where the shoulder seam sits on the model. Dropped onto the upper arm means intentional oversizing, so take your normal size. Sitting right on the shoulder point means standard cut.
Q: What if a product page has no measurements?
A: Email and ask before ordering. Any decent store will send them. A listing with no measurements and vague fit language is the most reliable predictor of a disappointing delivery.