While cleaning your Mac, you were a bit too enthusiastic and also emptied Mac Trash of important files. Now, you’ve just realized that you need them back. But the question here is, “Can you recover trash on Mac after emptying?” The answer unfortunately is not that simple.
So, how to recover emptied Trash on Mac actually and whether its even viable, we’ll be answering these questions for you in this post. At the end, you’ll definitely have a solution that works in your favor!
Part 1: Can You Recover Trash on Mac After Emptying?
Simply put, the answer is yes. You can recover items from emptied Trash on Mac. But this is based on variables like whether files have been overwritten, and type of storage (SSD or HDD). Recovery also depends on whether you have backups.
One thing to note here is that from 2013, most Macs come with SSDs, which makes data recovery harder, especially as these disks have TRIM enabled. Also, if you keep using your Mac after losing its files, the data will be overwritten, making recovery impossible. Unless you’ve got a backup on Time Machine, iCloud, or an external drive.
Part 2: The Easiest Way to Recover Emptied Trash on Mac
As long as your files are not overwritten, the easiest way to recover items from emptied Trash on Mac is with Mac data recovery software. Tenorshare 4DDiG is a trusted choice for many. It can get your files from various data loss situations such as corruption, formatting, accidental deletion, virus attack, system crashes, lost partitions, and much more. Here’s a breakdown of what this tool provides:
- Can regain 1000+ file types, including documents, videos, images, and many more.
- Can recover an emptied Trash with high success rates.
- Provides a free inspection of recovered files.
- Compatible with macOS 15, T2 chips, and all M1 chips.
- Has a user-friendly, intuitive interface.
- Can restore lost files to a local drive or the Cloud.
Here’s how to recover files after emptying Trash on Mac with aid of this tool:
Step 1: Download, install, and execute Mac Trash file recovery tool. Choose your hard drive and then file types form up top option. Click “Scan.”

Step 2: The tool will scan for lost files using their unique signatures. Pause or stop scan once you find files that you removed from Trash. Examine them beneath “Tree View” or “File View” to check whether you’ve got them back successfully.

Step 3: Select recovered files. Hit “Recover,” and exhort them to a secure place on your Mac.

Part 3: Alternative Ways to Recover Emptied Trash on Mac
If you want to recover emptied Trash on Mac for free here are 4 alternative ways to check out. Tough, these methods are only ideal if you’ve got a backup or if data loss is permanent.
Option A: Use a Time Machine Backup
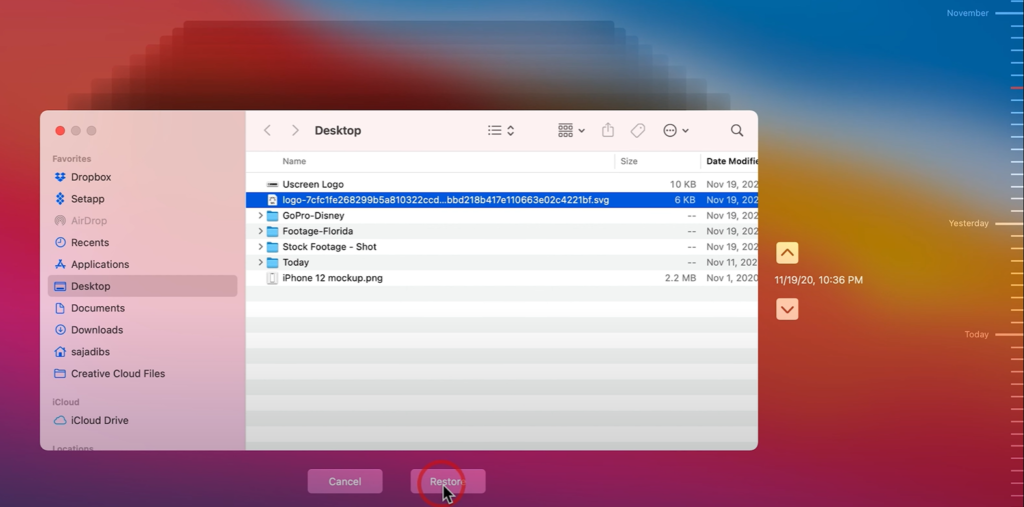
When turned on, Time Machine creates incremental backups of your files on an external drive. So, if you’ve enabled this feature, you can recover items from emptied Trash on Mac even if they were overwritten or erased permanently. Here’s how to recover files after emptying Trash on Mac with Time Machine:
Step 1: Attach your Time Machine backup drive to your Mac. Next, click Time Machine icon on dock. Select “Enter Time Machine.”

Step 2: Find an older version of folder with your target files, choose them, and click “Restore.”
Option B: Use iCloud Backup
iCloud backup is a good option if you don’t have Time Machine backup enabled. Here’s how to recover emptied Trash on Mac if you’ve turned on iCloud backup prior to loosing files:
Step 1: Open Safari, go to iCloud.com and log in with your Apple ID.
Step 2: Once logged in, scroll down and click on the “Data Recovery” option.
Step 3: Proceed by clicking on “Restor Files.” A list of recently deleted files will appear (files are usually recoverable for up to 30 days).
Step 4: Select the files you need by checking the boxes next to them. Finally, click “Restore.”
Option C: Use External Drive Trash Bin
The above solutions to recover emptied Trash on Mac for free were for internal macOS disk. But what if you were using an external drive and erased some files on it by mistake?
The matter of fact is that when you remove files from an external drive on a Mac, they shift to a hidden “.Trashes” folder on drive, and not on Mac Trash. So, even if you’ve emptied Mac Trash, the files were never there in first place and you can get them back from “.Trashes” folder. Here’s how to recover emptied Trash on Mac on external drive using Terminal:
Step 1: Execute “Terminal” on your Mac.
Step 2: Enter following command:
- defaults write com.apple.finder AppleShowAllFiles TRUE
- killall Finder

Option D: Contact a Data Recovery Service
If you’re unable to recover emptied Trash on Mac because the files are overwritten, reach out to a data restoration service. You’ll first need to find a reliable service to contact then send your disk to them. These services are on the high end of cost spectrum, but can also retrieve severely corrupted, permanently deleted and overwritten files. In addition to this, they can also reclaim data froma physically broken disk.
Bonus: Can You Recover Emptied Trash on Mac Using Terminal?
If you search for “Can you recover trash on Mac after emptying” on Google, you might come across some misleading blog posts. Many of these suggest using Terminal as a viable recovery method. However, the answer is no. Terminal command can only restore files if they’re present in Mac Trash. But it can’t recover them if you’ve already emptied Trash.
Part 4: How to Prevent Data Loss on Mac?
After you learn how to recover files after emptying Trash on Mac, succsefully, its time to avoid data loss on Mac which could happen intentionally or unintentionally. Here’s how to do that:
- Disable TRIM – TRIM improves SSD performance by marking unused data blocks for reuse, but it can also prevent data recovery on Mac. With TRIM enabled, deleted files are more prone to be overwritten, reducing chances of restoration. It also shortens recovery window, meaning you must act quickly to retrieve deleted files. Disabling TRIM can temporarily increase recovery chances if files are accidentally erased and no recent backup exists.
- Regular Backup – Use Time Machine or iCloud to backup your Mac regularly. For more control and advanced features you can also use Carbon Copy Cloner or Backblaze.
- Monitor Status Of Hard Disk – Use Apple Diagnostics here and now to check for hardware issues on your Mac. You can also use third-party tools like DiskWarrior or Drive Genius that offer advanced repair and diagnostics.
- Keep Your System Updated – Regular macOS updates fix security issues and improve stability, while app updates resolve bugs and boost performance.
- Scan For Viruses – Get a reliable anti virus installed on your Mac and regularly scan your system for viruses and malware.
Conclusion
If you want to learn how to recover emptied Trash on Mac because you’ve removed files from Trash by mistake, the chances of recovery are dependent on various variables. Backups like Time Machine or iCloud also act as the best safety net.
But if you don’t have them, 4DDiG Mac Data Recovery can help you reclaim files from a wide range of data loss situations including from emptied Mac Trash with a high success rate. In addition to this, regularly back up your data, disable TRIM on SSDs, monitor drive health, update your system, and use antivirus software to prevent losing files on your Mac.


