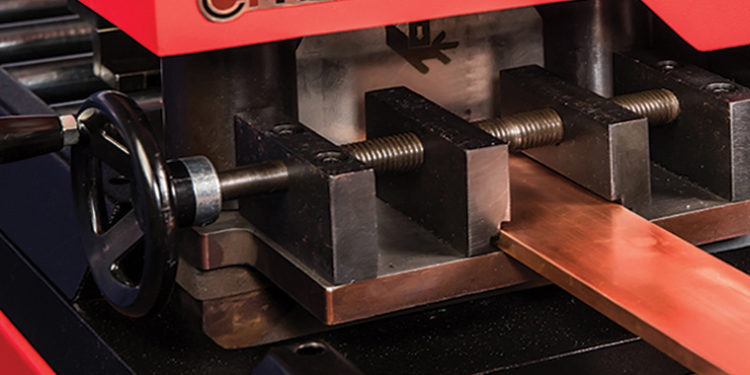
In the field of power equipment manufacturing, the quality of busbar punching directly affects the performance and reliability of equipment such as switchgear. Die clearance, as a core parameter of the punching process, is crucial, much like controlling the heat in cooking, requiring precise control. This article will delve into how die clearance affects the quality of the punched cross-section and provide scientific optimization suggestions.
I. Basic Principles of Die Clearance and the Punching Process
Die clearance refers to the radial distance between the punch and die during the punching process. This seemingly minor parameter actually determines the entire material separation process. When the clearance is appropriate, the material undergoes three stages: elastic deformation, plastic deformation, and fracture separation, forming an ideal punched cross-section. Taking a 10mm thick copper busbar as an example, its reasonable single-sided clearance is typically controlled between 0.8-1.2mm (i.e., 8%-12% of the material thickness). Under ideal clearance, the punching process exhibits a regular pattern: the punch first compresses the material, causing elastic deformation; as the pressure increases, it enters the plastic deformation stage, at which point micro-cracks begin to form inside the material. When the cracks generated by the upper and lower dies successfully converge, a smooth punched cross-section can be obtained. This process is similar to cutting paper; a proper scissor gap results in a smooth edge, while too large or too small a gap will produce burrs.
II. Negative Impacts and Formation Mechanisms of Insufficient Gap
When the die gap is less than 5% of the material thickness, significant quality problems arise. Specifically, secondary shear bands appear on the punched section, the proportion of bright bands increases abnormally, and the surface roughness deteriorates significantly. Experimental data shows that when the gap decreases from the standard value to 3%, the punching force increases by 25%-30%, and the die wear rate accelerates more than three times. From a microscopic perspective, when the gap is too small, the cracks generated by the upper and lower dies cannot converge smoothly. Continued downward pressure from the punch causes secondary shearing of the material, forming obvious step-like marks on the cross-section. This is like cutting paper with dull scissors; repeated squeezing is required to break the paper, inevitably resulting in uneven edges. In actual production, this situation also leads to a sharp increase in die temperature, accelerating die failure. For example, in a small-scale switchgear manufacturing enterprise, due to an excessively small die gap setting (0.3mm on one side) on the busbar punching machine, severe burrs appeared on the copper busbar punched section, with a maximum height of 0.15mm. These burrs scratched the insulation layer during assembly, causing multiple insulation failures and direct economic losses exceeding 500,000 yuan.
III. Problems and Causes of Excessive Clearance
When the die clearance exceeds 15% of the material thickness, another quality problem arises. The material is overstretched during punching, resulting in a rough, torn fracture surface. Tests show that when the clearance is too large, the punch diameter will be 0.1-0.3 mm larger than the punch diameter, severely affecting assembly accuracy. From a materials mechanics perspective, excessive clearance causes the material to bear tensile stress far exceeding shear stress. Like tearing cloth, the material is forcibly torn rather than neatly cut, inevitably resulting in a rough and uneven cross-section. In this case, obvious bevels and burrs will appear at the punched edges, and the cross-sectional collapse may reach 10%-20% of the material thickness. A distribution box manufacturer once experienced a severe decline in the quality of aluminum busbar punching due to excessive clearance (1.8 mm on one side) caused by die wear. Not only did the cross-sectional roughness Ra value deteriorate from 3.2 μm to 12.5 μm, but the hole diameter deviation also reached 0.25 mm, leading to rework of batch products and a 40% reduction in production efficiency.
IV. Scientific Methods for Determining Die Clearance
Determining the optimal die clearance requires considering several factors:
1. Material Properties: For copper busbars, a clearance of 8%-12% of the material thickness is recommended; for aluminum busbars, 5%-8%.
2. Material Thickness: The greater the thickness, the higher the clearance ratio should be.
3. Punching Accuracy Requirements: For high-precision applications, a smaller clearance value should be used.
Specifically, refer to the following calculation formula: Reasonable single-sided clearance c = k × t Where t is the material thickness, and k is a material coefficient (0.08-0.12 for copper, 0.05-0.08 for aluminum). For example, when machining a 12mm thick copper busbar: Reasonable single-sided clearance = 0.1 × 12 = 1.2mm. A total clearance of approximately 2.4mm is most suitable.
V. Comprehensive Impact of Die Clearance on Punching Quality
1. Impact of Cross-sectional Quality Under optimal clearance, the cross-section exhibits typical four-zone characteristics: a rounded corner zone (approximately 10% of the material thickness), a bright zone (35%-40%), a fracture zone (45%-50%), and a burr zone (<5%). A 10% change in clearance significantly alters the proportions of each zone.
2. Impact of Dimensional Accuracy: For every 0.1mm increase in clearance, the punching diameter deviation increases by 0.02-0.05mm. For precision punching, this deviation must be controlled within 0.1mm.
3. Impact of Die Life: A suitable clearance can extend die life by 3-5 times. Insufficient clearance will cause the die temperature to rise by over 100℃, leading to premature wear of the cutting edge.
VI. Practical Suggestions for Optimizing Die Clearance
1.Establish a Clearance Database: Record the optimal clearance values for different materials and thicknesses. For example:
- 6mm copper busbar: single-sided gap 0.5-0.7mm
- 8mm aluminum busbar: single-sided gap 0.4-0.6mm
- 10mm copper busbar: single-sided gap 0.8-1.2mm
2. Implement a dynamic adjustment mechanism: Check the gap every 5000 stamping cycles; adjust promptly if wear exceeds 0.05mm. Use a die holder with scale adjustment to achieve micron-level precision adjustment.
- Strengthen process monitoring: Install pressure sensors to monitor changes in stamping force; force fluctuations exceeding 15% prompt for gap inspection. Use an industrial endoscope to regularly observe cross-sectional quality.
VII. Typical Case Analysis
SUNSHINE, CNC busbar machine manufacturer, has achieved significant results in busbar punching technology by optimizing die clearance management:
Punching pass rate increased from 92% to 99.5%
Die life extended to 150,000 cycles
Annual maintenance cost savings of 800,000 yuan
Product insulation failure rate decreased by 70%
Key measures included: establishing standard operating procedures for clearance, adopting digital clearance measuring instruments, and implementing preventive maintenance systems.
Conclusion
The impact of die clearance on the cross-section of busbar punching is systematic and multi-layered. Appropriate clearance not only ensures cross-sectional quality but also improves production efficiency and extends die life. Manufacturing enterprises should establish a scientific clearance management system and strengthen process control to continuously improve product quality. With advancements in testing technology, automatic monitoring and adjustment of clearance is expected to be realized in the future, making punching quality control more precise and efficient.







![5 Best CFD Brokers for Beginners [UK, 2026]](https://todaynews.co.uk/wp-content/uploads/2026/03/Invest-360x180.jpg)


