


![5 Best CFD Brokers for Beginners [UK, 2026]](https://todaynews.co.uk/wp-content/uploads/2026/03/Invest-360x180.jpg)


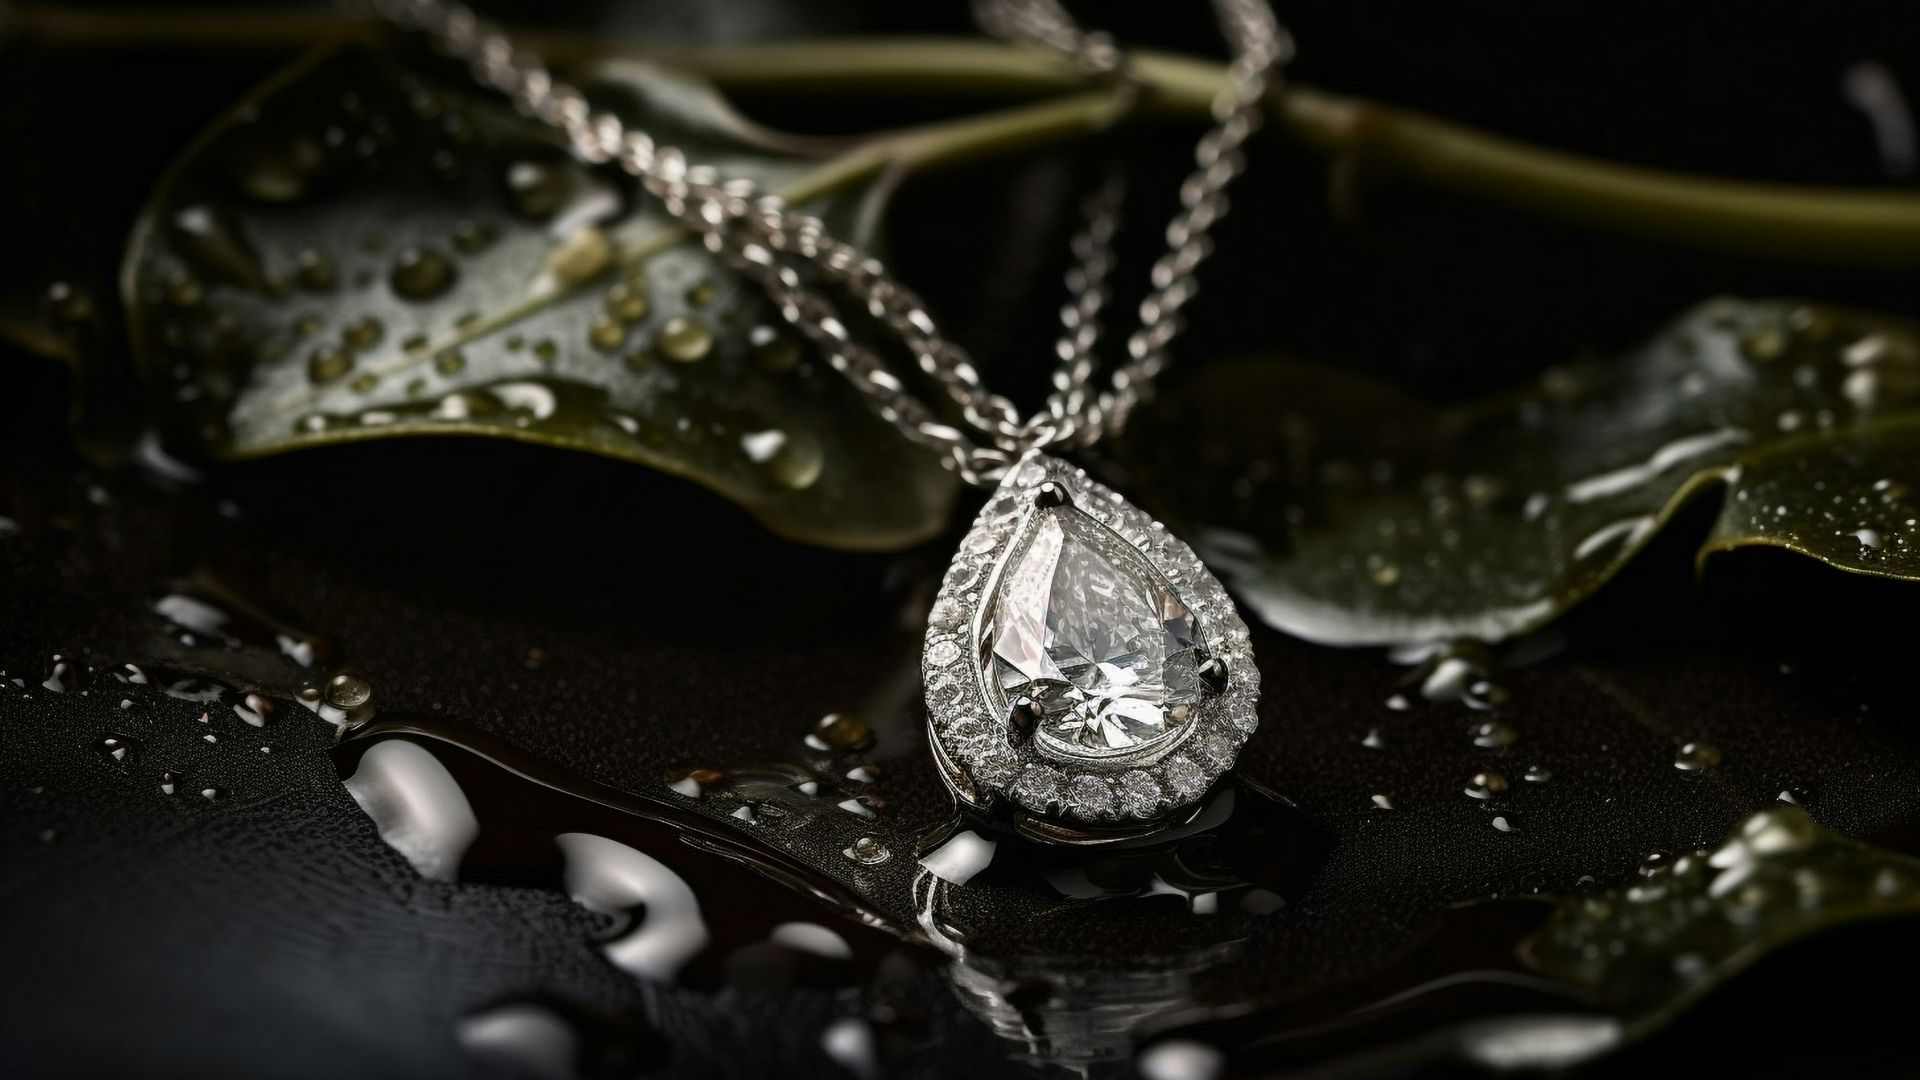
You know that feeling when you see a gorgeous pendant necklace in a store window, and your wallet immediately starts crying? Yeah, I’ve been there too. But here’s something most people don’t realize – making your own pendants is actually pretty straightforward.
I remember my first attempt at pendant making. Total disaster. The glue went everywhere, my wire looked like a toddler had twisted it, and I’m pretty sure I used way too much of everything. But that was three years ago, and now I make pendants that get compliments every single time I wear them.


The crazy part? Recent surveys show that 73% of people prefer handmade jewelry over store-bought pieces. And get this – you can create stunning pendants using stuff that costs less than twenty bucks total.
I’m going to walk you through exactly how I learned to make pendants that look professional. We’ll cover three methods (from super easy to more advanced), plus I’ll share all the mistakes I made so you don’t have to make them too.
Ready to surprise yourself with what you can create? Let’s dive in.
Getting Your Supplies Together
Okay, first things first. You really don’t need to break the bank here. Most of this stuff might already be hiding in your junk drawer anyway.
Tools You Actually Need
The Basics (seriously, under fifteen dollars):
- Round-nose pliers (get the small ones)
- Chain-nose pliers
- Wire cutters that actually cut
- Decent scissors
- Cotton swabs (trust me on this one)
Materials That Work Best:
- 18-gauge craft wire (anything thinner just breaks on you)
- Jump rings around 6mm
- Glass cabochons or pendant trays
- Strong jewelry glue or Diamond Glaze
- Pretty paper, fabric scraps, or photos
Here’s what I wish someone had told me when I started: don’t go crazy buying everything at once. Pick one method, get those supplies, and master that first. Then move on to the next thing.
Method 1: Glass Cabochon Pendants (Perfect for First-Timers)
This is where I tell everyone to start. It’s basically foolproof, takes about fifteen minutes, and looks way more complicated than it actually is.
How to Do It Step by Step
Step 1: Pick Your Background Stuff: This is the fun part. Old greeting cards work amazingly. So do fabric pieces, pressed flowers (if you’re into that), or even printouts of your own photos. I once used a piece of my grandmother’s old wallpaper – it turned out gorgeous.
Step 2: Find Your Perfect Spot: Put the glass piece on top of your chosen material and move it around. You’re looking for that perfect little section that’ll look great under the glass. Don’t cut anything yet – learned that lesson the hard way.
Step 3: Glue Time: Squeeze a good amount of Diamond Glaze onto the flat side of your glass. You want enough that it’ll squish out a little when you press down. That’s actually good – means you’ve got full coverage.
Step 4: Press It Down: Push the glass firmly onto your material. Hold it there for maybe thirty seconds. Then grab a cotton swab and clean up any glue that oozed out. This step matters more than you’d think.
Step 5: The Waiting Game: Let it dry completely. I usually leave mine overnight, but two hours is probably enough if you’re impatient like me.
Step 6: Trim Around the Edges: Once it’s totally dry, carefully cut around the glass with your sharpest scissors. Take your time here – sloppy edges will show.
Step 7: Stick It in the Setting: Put one of those sticky dots in the center of your metal pendant tray. Press your glass piece down. Those little adhesive dots are surprisingly strong.
Things I Learned the Hard Way
- Use paper with tiny, detailed patterns – they look incredible under glass
- Don’t rush the drying time (seriously, just don’t)
- Buy extra glass pieces because you’ll want to make like five of these once you see how good they look
Method 2: Wire-Wrapped Stone Pendants
This one looks super intimidating, but really isn’t. Once you get the hang of it, you can turn pretty much any interesting rock into jewelry.
The Actual Process
Step 1: Cut Your Wire Right: You need about eight inches of that 18-gauge wire. More than that, and you’ll get confused. Less and you’ll run out halfway through.
Step 2: Make the Top Loop: Use those round-nose pliers to make a small loop at one end. This is where your jump ring goes later, so don’t make it huge.
Step 3: Position Everything: Put your stone about two inches down from that loop. The exact spot depends on how big your stone is, but two inches usually works.
Step 4: Start Wrapping: Here’s where it gets fun. Wrap the leftover wire around your stone however looks good to you. Some people do neat horizontal lines. I usually end up with something more random, but it works.
Step 5: Tuck the End: Use your chain-nose pliers to tuck that wire end so it doesn’t stick out and scratch people. Nobody wants a scratchy pendant.
Stones That Actually Work
Not every rock makes a good pendant. Here’s what I’ve had success with:
- Those smooth stones you find at the beach
- Any tumbled gemstones from craft stores
- Sea glass (if you can find it)
- Big focal beads
Stay away from tiny stones or anything with sharp edges. Trust me on this one.
Method 3: Polymer Clay Magic
This method is where you can really go crazy with creativity. Any shape, any color, any texture – it’s all possible with polymer clay.
Making Your Clay Pendant
Step 1: Get the Clay Ready: Knead that clay until it feels soft and workable. Usually takes a few minutes of squishing it around.
Step 2: Roll It Out: Roll it to about a quarter inch thick. Use cookie cutters if you want basic shapes, or just wing it with a knife.
Step 3: Add Cool Details: This is my favorite part. You can use stamps, random household stuff, whatever creates interesting textures. I’ve used everything from plastic forks to lace to create patterns.
Step 4: Don’t Forget the Hole: Before you bake it, poke a hole for your jump ring. Make it bigger than you think you need – clay shrinks a tiny bit when it bakes.
Step 5: Bake It Right: Follow whatever your clay package says exactly. Most want 275 degrees for fifteen to thirty minutes. Don’t guess – use a timer.
Step 6: Finishing Touches: Once it cools down, you can sand it smooth if needed. Paint it, add metallic stuff, whatever makes it look how you want.
Cool Advanced Tricks
- Marble effects: Mix two colors, but don’t blend them completely
- Stamp patterns: Rubber stamps work great on clay
- Metallic finishes: Mica powder makes things look expensive
When You Want That Professional Look
Look, making your own pendants is awesome, but sometimes you want something that looks like it came from a high-end jewelry store without actually learning all the advanced techniques.
That’s exactly what IceATL does. These guys take your rough ideas and turn them into pieces that look like they cost way more than they actually do. They use all that fancy CAD design software and professional equipment that most of us don’t have access to.
What’s cool about their process is that they actually show you a 3D model before they make anything. So if you want something like a hip hop moissanite pendant but have no clue how to make it yourself, they’ve got you covered.
I’ve seen their work, and honestly, it’s the kind of stuff that makes people ask where you bought it. Sometimes it’s worth letting the pros handle things while you focus on the fun, easy projects.
Making It Look Expensive (The Finishing Secrets)
The difference between “I made this in my garage” and “Where did you buy that beautiful piece?” usually comes down to how you finish everything.
Getting That Professional Shine
For Metal Stuff: Use jewelry polishing cloths and work in small circles. Start gently, then add more pressure if you need it. This gets rid of tiny scratches and makes everything shiny.
For Glass and Stones: Soft microfiber cloths work best. Never use anything rough on delicate surfaces – learned that the expensive way.
Creating Vintage Effects
Want that antique look? Liver of sulfur solution creates awesome patina effects on copper and silver parts. Just be careful with it – a little goes a long way.
Picking the Right Chain
Your chain choice changes everything:
- Delicate chains work great with small, detailed pendants
- Chunky chains need bigger, bolder pendants to balance out
- Textured chains make simple pendants look more interesting
Mistakes I Made So You Don’t Have To
I’ve messed up pretty much every way possible. Here are the big ones to avoid:
Don’t Skip the Planning Phase
I used to just start making stuff without thinking it through. Spend ten minutes sketching what you want first. It’ll save you hours of frustration and wasted materials.
Don’t Buy Cheap Jump Rings
They break. Every time. Just spend the extra couple of bucks on decent ones.
Don’t Rush Anything
I know you want to see the finished product, but glue needs time to cure. Paint needs time to dry. Clay needs proper baking time. Rushing makes things look amateur.
Size Matters More Than You Think
A tiny pendant on a thick chain looks weird. A huge pendant on a delicate chain is overwhelming. Match your proportions, and everything looks more professional.
When Things Go Wrong (And How to Fix Them)
Glass Won’t Stick
Usually, it means you didn’t use enough glue or there’s oil on something. Clean everything with rubbing alcohol and use more adhesive.
Wire Keeps Breaking
You’re probably using wire that’s too thin or bending it too sharply. Switch to 18-gauge and make gentler curves.
Clay Cracked While Baking
Your oven probably runs hot. Get an oven thermometer – most ovens are off by 25-50 degrees.
Everything Looks Dull
Polish with jewelry rouge or invest in a small tumbler if you’re making lots of pieces.
Ideas When You’re Stuck
Sometimes you just need inspiration. Here’s what always works:
Nature Stuff
- Real flowers pressed under glass
- Wire-wrapped crystals and interesting rocks
- Clay with leaf impressions and metallic paint
Personal Touch
- Photo pendants with family pictures
- Initial pendants in different styles
- Collections based on birthstones
Modern and Clean
- Simple geometric wire shapes
- Clay pendants with crisp lines
- Mixed materials combined thoughtfully
Old-School Vintage
- Oxidized finishes on metal
- Victorian-inspired designs
- Locket-style pieces
Getting Better at This
Once you’ve got the basics down, these advanced techniques will really set your stuff apart:
Advanced Wire Stuff
Learn to make spirals and complex wrapping patterns. It takes practice, but these techniques turn basic wire into something that looks incredibly sophisticated.
Mixing Different Materials
Combine clay with wire accents. Add glass elements to metal frames. Use stones with beaded borders. Mixed media pieces always get attention.
Professional Assembly Techniques
Learn the right way to open and close jump rings. Master different bail styles. These tiny details separate amateur work from professional-looking pieces.
What This Actually Costs
Let’s talk real numbers here:
Getting Started (One-Time Costs)
- Basic tools: around $12-15
- Variety pack of materials: $20-25
- Total to get started: $35-40
Cost Per Pendant After That
- Simple glass pendant: $2-3 in materials
- Wire-wrapped stone: $3-5
- Polymer clay piece: $1-2
Compare that to buying similar pendants at stores: $25-75 each. You’ll save money after making just a few pieces.
What Happens Next?
You’ve got everything you need now to make pendants that people will actually want to wear. My advice? Start with that glass cabochon method. It works every time and gives you impressive results right away.
Pick one technique from what we’ve covered and try making your first pendant this weekend. Don’t worry about making it perfect – just focus on enjoying the process and learning as you go.
Once you’ve made a few, you’ll totally get why people become obsessed with making jewelry. There’s something really satisfying about wearing something you created yourself.


![5 Best CFD Brokers for Beginners [UK, 2026]](https://todaynews.co.uk/wp-content/uploads/2026/03/Invest-120x86.jpg)