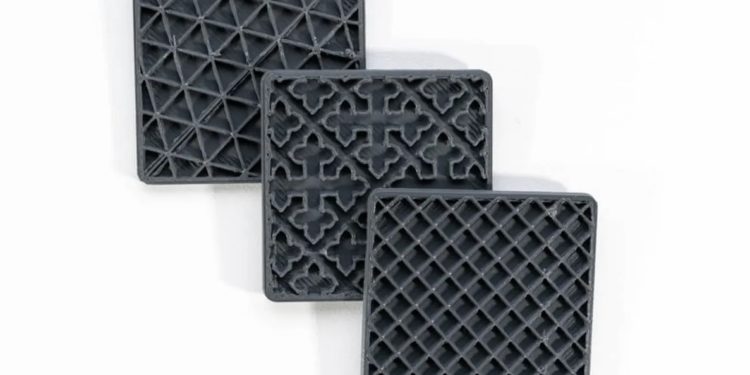
The capacity to control the level of hollowness in a printed object is a huge plus for 3D printing. When compared to solid parts, hollow ones are lighter and cheaper to produce since they use less material and time during the manufacturing process.
The material that fills the interior of a 3D print is known as infill, and its density can be changed from 0% (hollow) to 100% (solid). In addition, there are a plethora of patterns that may be used to alter the filling of a portion, and each of these patterns has its own set of advantages and strengths. In this post, we will examine numerous infill patterns, with a focus on those available in Cura. Yes, let’s begin now!
What are Infill Patterns in 3D Printing?
A fused filament manufacturing (FDM) 3D printer builds a three-dimensional item by extruding and depositing filament in layers. But the inside of most 3D printed components isn’t entirely hollow; rather, it’s a combination of solid plastic and air.
The infill density of a print is the ratio of plastic to space; a value near to 0% indicates that the part is primarily hollow, while a value close to 100% indicates that it is mostly solid. Around 30-50% density is typical for prints.
The infill pattern is crucial because the geometrical structure of the inside plastic is equally significant as the density. The inside of a print can have a variety of 2D or 3D patterns, such as lines, grids, triangles, and many more. Aside from influencing print durations and material consumption, the selected pattern can significantly alter the printed component’s rigidity, density, and pliability.
How can Cura enhance your infill pattern and why is it vital for infill design?
Understanding infill’s function will be much simpler after you’re acquainted with Cura and Infill. It all starts with the slicing software. You might already be aware that there are several fantastic resources available, like Simplify3D, Cura, and others. It will be easy for you to start with Cura software since it is accessible at no cost.
Because it lets you personalise your 3D model to a large extent, Cura offers several practical advantages. Let’s take a brief look at the capabilities of this slicing programme that can enhance the infill quality and maximise the preservation of your filament.
- The number of infill designs will be too varied.
- An excellent tool for providing your 3D model with the strength you require.
- Reduces the overall mass of the model, which means less filament will be used up.
What are the Fastest Infill Patterns in Cura?
1. Grid
Although it seems similar to the line pattern, the Grid pattern adds lines in both directions, making it stronger in the XY axis. It is ideal for items that are intended to endure horizontal stresses because it is widely considered one of the strongest infills. Its consistent composition makes it an excellent base for a wide range of uses.
2. Lines
A simple method that distributes material in a straight line is the Lines pattern. Although it isn’t the most durable filler, it works well for projects that are aesthetically pleasing. Offering simplicity and minimal material utilisation, its unique layering approach results in alternating unidirectional lines.
3. Triangles
The Triangle infill uses triangular shapes instead of the usual grids. Although crossing points may marginally disrupt the flow, its power is most apparent in horizontal directions. If you use this pattern for your printing, you can create an efficient and sturdy framework inside.
4. Tri-Hexagon
With a little offset, the lines in the Tri-Hexagonal pattern give the classic triangle infill a new spin. The result is an infill that is stronger than before thanks to a mix of tiny triangles and hexagons. The Tri-Hexagonal infill is ideal for pieces that demand strength because of its greater resistance to horizontal forces.
5. Cubic
Three-dimensional cubes perched on a corner make up the Cubic infill pattern in Cura. By avoiding overhangs, this orientation produces pretty high strength in every direction. And because there’s no room to expand inside a cube, the top layer doesn’t get as puffy as it would otherwise.
Commonplace components or those with functional needs for all-around strength can benefit from the cubic layout.
6. Cubic Subdivision
Cubic Subdivision, an algorithmically complex pattern, is a “smarter” take on Cubic that aims to reduce material consumption, speed up printing, and keep strength levels high.
The cubes in Cubic Subdivision range in size from small to huge, with the densest portions located in the middle of the structure. When considering printing speed, weight reduction, and strength, it is the ideal infill pattern to use. But slicing it can be a tedious ordeal.
7. Octet
In the Octet infill design by Cura, cubes and tetrahedrons (triangular pyramids) come together to form a sturdy interior frame at the points where their edges touch. It works well with thin mechanical components in particular.
Octet infill might result in subpar top surface quality, despite its high strength. The lengthy bridging distance, the interval between solid filler materials needed to add the solid shell surrounding the part, is to blame for this.
8. Quarter Cubic
The infill pattern known as Quarter Cubic uses tetrahedrons and truncated tetrahedrons. It forms an internal frame that can disperse loads, similar to the Octet infill design.
While it’s great for functionally thin sections that need a lot of strength, the large bridging distance means that top surface quality could take a hit.
9. Zig-zag
Rather than beginning a new line whenever the nozzle hits an outside wall, as in the Lines pattern, the zigzag infill pattern joins the lines together. Zig-zag printing is quick and works well for simple graphic prints.
Since the nozzle isn’t required to retract the filament and travel when using Zig-zag rather than lines, it may be preferable. This uses slightly more material, but it helps prevent leaking, which is especially important with low-viscosity filaments like PETG.
10. Lightning
New to Cura 4.12 since its release in December 2021, the infill pattern is a topology optimisation technique that creates ragged internal support structures whose only function is to hold the build’s roof in place.
Faster and lighter printing are possible with lightning infill since it requires very little material. It works well for visual prototypes and other pieces with a modest strength need.
11. Cross
The Cross infill pattern eliminates the need for lengthy, straight horizontal lines, making it ideal for printing with flexible filaments that have a low infill percentage. The result is a great deal of flexibility in all horizontal directions and very little rigidity.
Flexible materials are not able to ooze since the Cross pattern does not necessitate retraction. One drawback of the 2D pattern is that it is less flexible in the vertical plane due to its comparatively high strength along the Z-axis. This is especially true for flexible sections.
12. Cross 3D
The Cross 3D pattern gets rid of the Cross’s unattractive vertical strength, but it comes with the catch of lengthier slicing times. Because it is weak in all directions, Cross 3D is very flexible.
As far as part flexibility is concerned, Cura’s Cross 3D infill pattern outshines both Cross and Concentric. It is impervious to leaking because, like Cross, it does not necessitate retraction.
13. Concentric
Cura’s Concentric infill scheme mimics the form of the outside walls by use of concentric circles. It is ideal for pliable components because, when printed with a low infill density, its strength is extremely low in all directions. (The component will be more stiff with an increased infill density.) Since the lines in this infill pattern do not overlap, they are able to distribute loads uniformly, which results in the strongest prints when printed at 100% infill.
Overall Best 3D Modeling and Slicing Software – “SelfCAD”
There are a lot of 3D printing software available that you can use to create your files and even prepare them for 3D printing. A good example is SelfCAD. SelfCAD is an easy-to-use 3D design software that has been designed for both beginners and professionals. It comes with various tools like freehand drawing and sketching that you can use to create your 3D models from scratch. You can also use the image to 3D model tool to convert photos to 3D models.
In addition to 3D modeling tools, SelfCAD comes with various 3D printing tools that are useful for preparing your files for 3D printing. For example, there is the magic fix tool that you can use to fix any meshes with your design and ensure that all polygons are manifold and it ensures the file is watertight. Get to know how to use the magic fix tool of SelfCAD in the video below.
SelfCAD also comes with its own in-built online slicer that you can use to slice your designs and generate the G-code to send to your 3D printer. The video below shows how SelfCAD works.
Final Verdict
There is a lot of leeway for users to experiment with print speeds, material utilisation, and mechanical property tuning using Cura’s 14 default infill patterns. Finally, it’s obvious that strength, filament cost, model adaptability, and surface smoothness are the four most significant criteria to consider when choosing Cura infill patterns. All the information you need to know about the infill pattern in Cura is included in this comprehensive tutorial. Also, use the comment section to inform us if something is missing.

